Simple tricks to estimate testing hours with test cases or without test cases. How ?

Hey guys n girls,

I am here again with a new and interesting mind blowing word “Estimate” 🙂

When somebody in IT sector/software field or any field talks about estimates then they are never real estimates.They are simply assumptions made by more or less experienced persons.

Now let’s come to the topic – It came in my mind when first time my Project manager asked me to estimate the testing hours or my work hours for test case preparation and testing.

Well at that time I was very new so that I thought how can I estimate my effort because in previous company my Project manager really estimates my work like by saying “Man ! you have to do this task in two hours or in three hours ” at that time I had not known how my PM is estimating my effort, has he have any super powers ? ;).

1

But now I really know that those estimates was not just estimates but they are a type of targets for me which is set by my project manager without asking to me :(.

So this time when You have any requirement then I tell you what you should do to write estimates 🙂

Guys let’s take a simple example if requirement is to test the function of a phone number text box then how you have to judge it for estimation in your mind.

1. You have to consider in air (in your mind) that Phone number is a number box so

Step 1First it will take only numbers

Step 2 Then it can take (brackets) and Step 3 if required then it can take hyphen “- “also

Step 4 Fourth is your text box should be GUI aligned or perfect with GUI.

So all you have is above points are in your mind(may be more than above) so you can easily count above steps which are 4 steps here.

So you will have to estimate that you will have 4 test cases exactly but for your safety take some other conditions or like if you are forgetting something so say your project manager about 6 test cases you will write in above requirement.

2

Now it’s time to count time of above test cases.

Consider you will take time to write each test case – 2 minutes (you can take 3 or 5 minutes if you are lazy like me ;))

Now  Total 6 test cases time = 6X2 = 12 minutes then approx it to 15 minutes

So tell your PM that you will take 15 minutes to write test cases.

Now the time comes to execute above test cases or if you have readymade test cases then how you will estimate time ???

You don’t have to make lot of effort, here is the simple steps

1. Just count your test cases like in above case you have 6 test cases

2. Again give time for each test case to execute and one more golden rule “Always write word “Average” in front of your estimated time ” because it will save you in future if anything bad happened in project :(.

3. Now for 6 test case again average time to execute each one = 3 minutes(depends on your speed and also relation with PM :D)

So for 6 test cases 6X3= 18 minutes so you can say it will take 20 minutes to execute test cases.

Friends wait wait..you are thinking why I am estimating extra so just remember you will not only execute test cases but you will have to take screenshots or write some text for issue if any found(if not found any issue then you can text your girl friend in that time ;):))

So by above steps you can better estimate just forgot those theoretical bla bla bla…methods to estimate.

Thanks for reading friends.

See you in next…. :)(y).

Please like us on facebook for more to connect
https://www.facebook.com/pages/Knowledge-World-For-You/1660665640835573

How to use Badboy tool for Recording Jmeter load testing scripts ?

Hey Friends,

During my work, I found someone saying that this SSL techniques of Jmeter for recording the load testing script is someway hard to understand and apply, so one of my friend suggested me to use Badboy tool, it is free to use.

So How to use Badboy script in Jmeter ?

Here are the steps for beginners and smart people –

1. Install the badboy tool from link http://www.badboy.com.au/download.

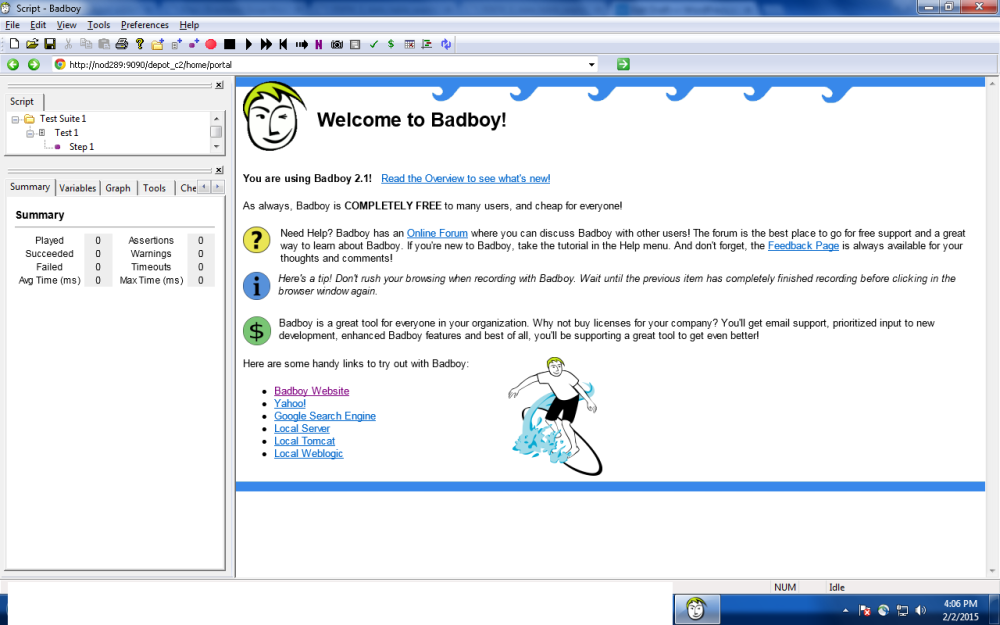
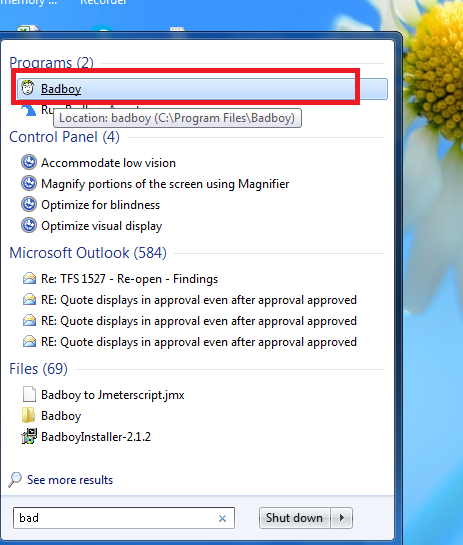
2. Now open the bad boy tool from your startup menu

badboy1

3. This will open your bad boy tool with a cool boy icon.

badboy2

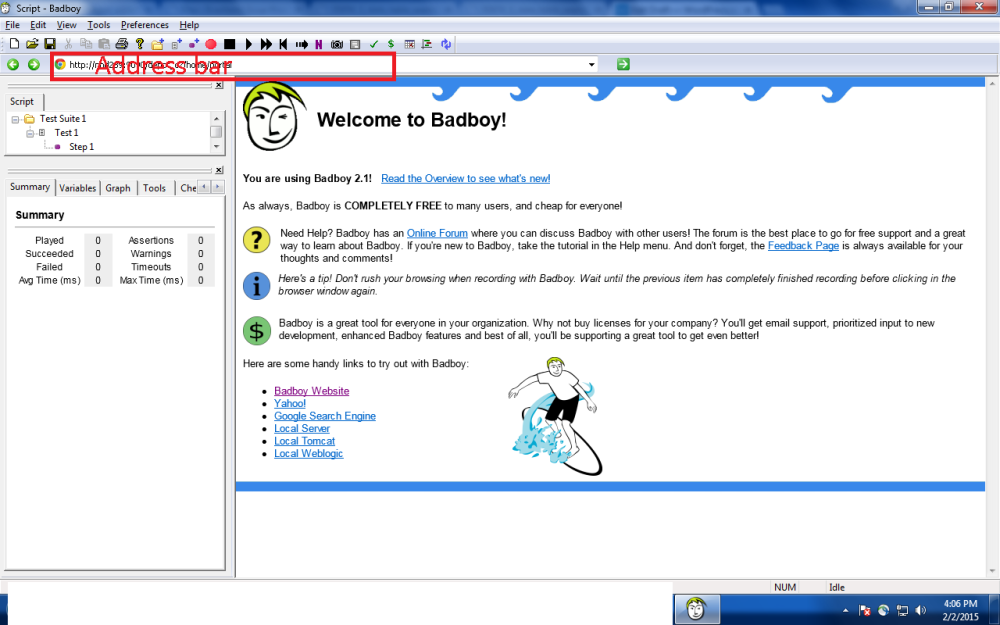
4. Now you will see an address Bar on the top of the application

badboy3

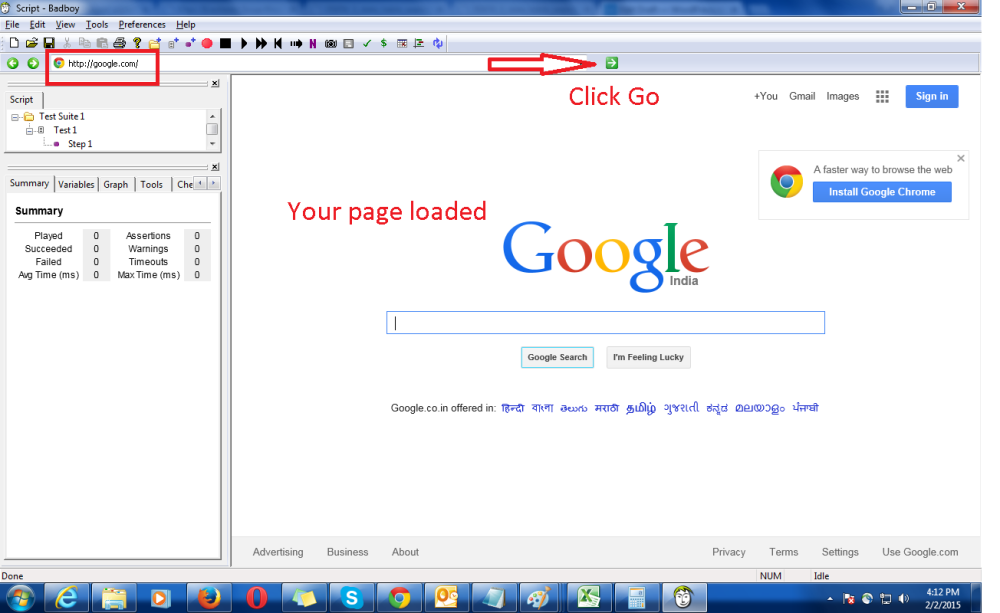
5. Enter your Application (which you want to test for load or performance) URL in the address bar and Click Green icon or directly press enter button. It will load your URL of application.

badboy4

6. Now a good point for those who are thinking that My application is working on Local IP so is it work for that ? So don’t worry my friends, it will work for those also.

You can check screenshot in above point 4, there I had used an IP address on which my application was running, so dont worry…. 🙂

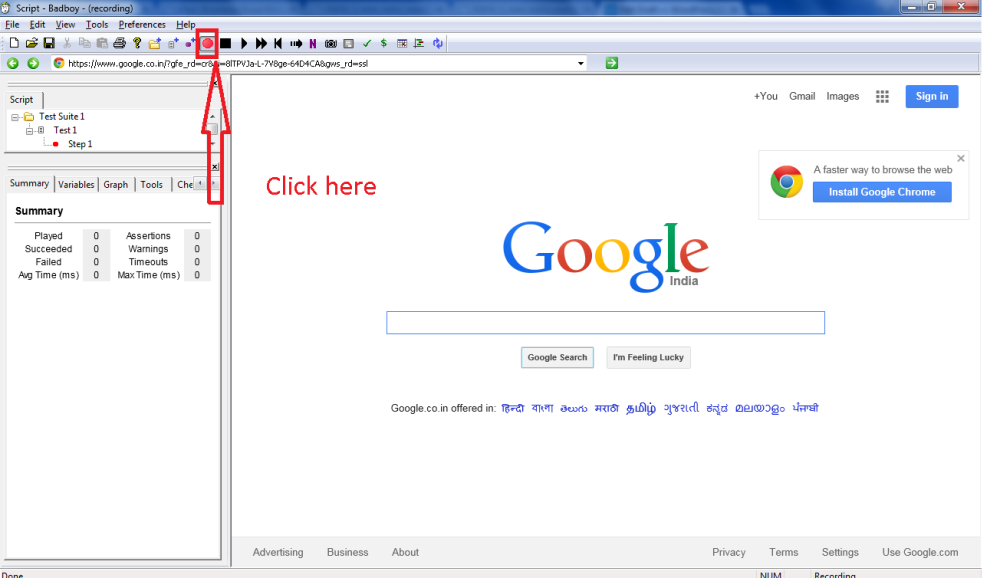
7. Now after entering URL of application, you can see that there is a dark red button on the tool bar of this application… Yes you got it right….. 🙂 Click on that red button.

badboy5

8. Now your script recording is started, now click on the pages or actions which you seems to be performed for load testing like search records, listing pages, data grid.

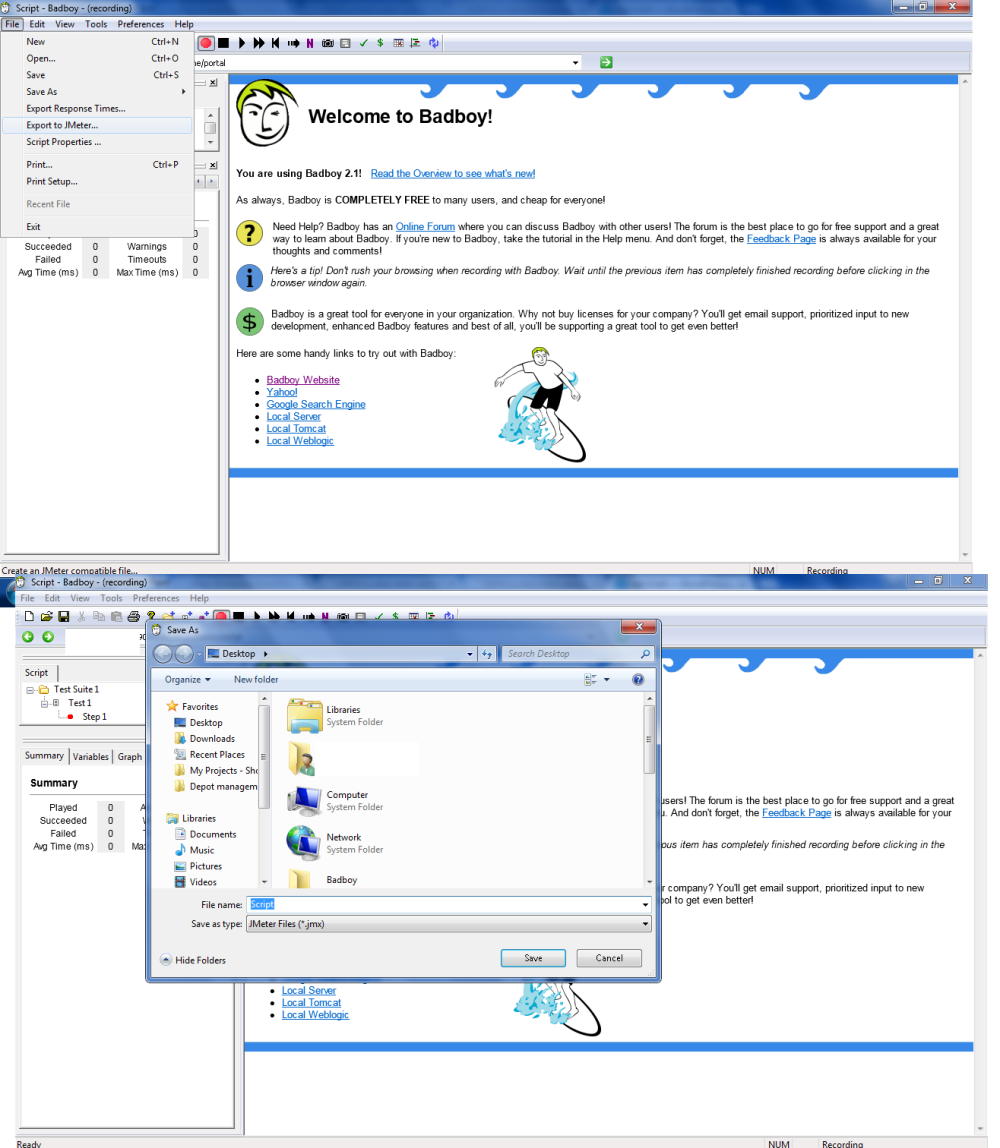
9.Now export this file to Jmeter by going into File>Export to jmeter

HOW TO LOGIN IN A SITE WITH USERNAME AND PASSWORD USING SELENIUM WEBDRIVER


10. Now you can use this .Jmx file into your Jmeter tool and run this.

So this is all about use of badboy to create jmeter script.

You can also see the results in Badboy tool on left hand side of tool by clicking on samples

It will give you graph view etc.

I personally suggests to use Jmeter proxy recording.

Thank you guys n girls. Keep posting your responses…

Thanks for reading….See you in next post. 🙂

Thank you for your appreciation and donations 🙂 and if you really feel happy by reading this, then you can help us by donation using donation box or using paypal link https://www.paypal.me/knowledgeworldforyou 🙂 [Donation box is in the left side bar on our website (http://www.knowledgeworldforyouteam.com/ ) ]. We will be really grateful to you 🙂 and still we are 😉 .

donation-box

Please visit us and like on social media to encourage us more for writing and sharing with You.
http://www.knowledgeworldforyouteam.com/
https://www.facebook.com/Knowledge-World-For-You-1660665640835573/timeline/
https://twitter.com/you_knowledge

JMETER – PERFORMANCE OF CPU AND MEMORY USAGE USING PERFMON PLUGIN

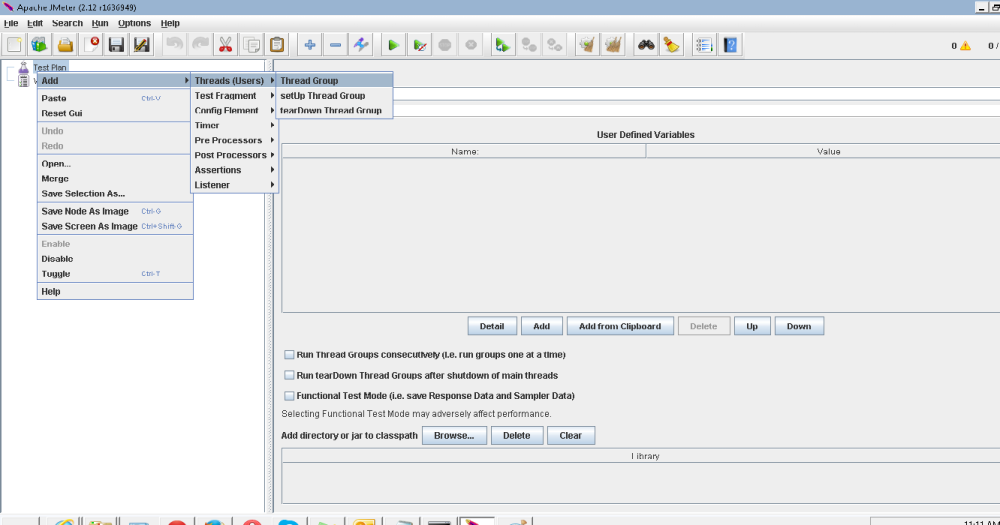
  1.  Open the Jmeter Application by clicking Jmeter.bat file in your Jmeter>bin folder-jmeter 12. Right click on test plan>Thread groud>Add thread (Number of users you want to test for)jmeter 23. Right click on thread group >Logic controller> Recording controller –

    jmeter 3

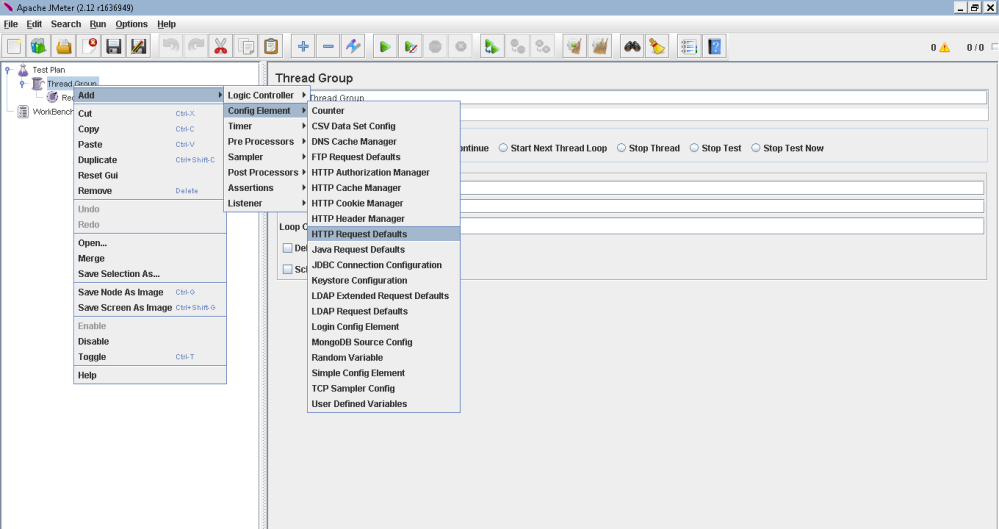
    4. Right click thread group>Config elements and add all four requests

    4.1 HTTP default request, HTTP Cache manager, HTTP Cookie manager,HTTP header manager

    jmeter 4

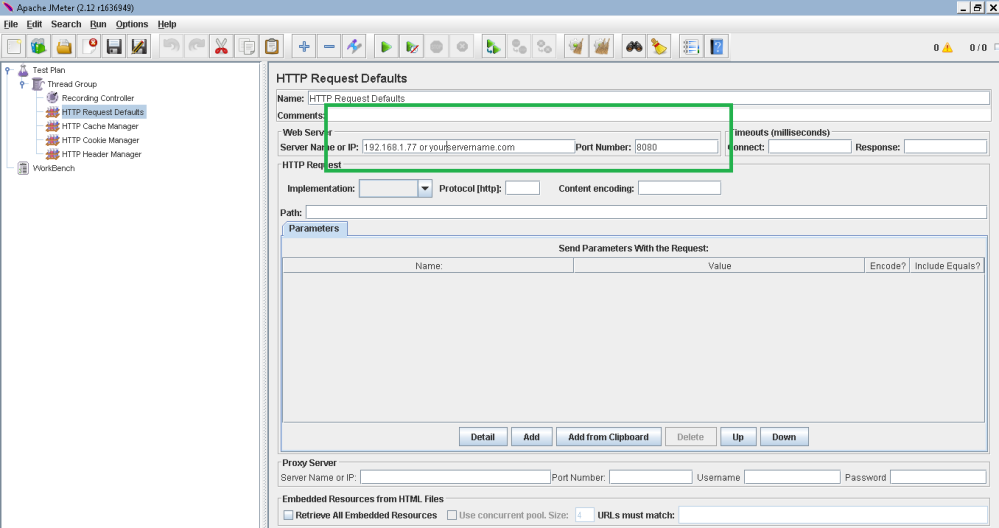
    5. Now click on HTTP requests default and in right side enter server name like (jmeter.apache.org or 192.168.1.xx)and Port number (default 8080).

    jmeter 5

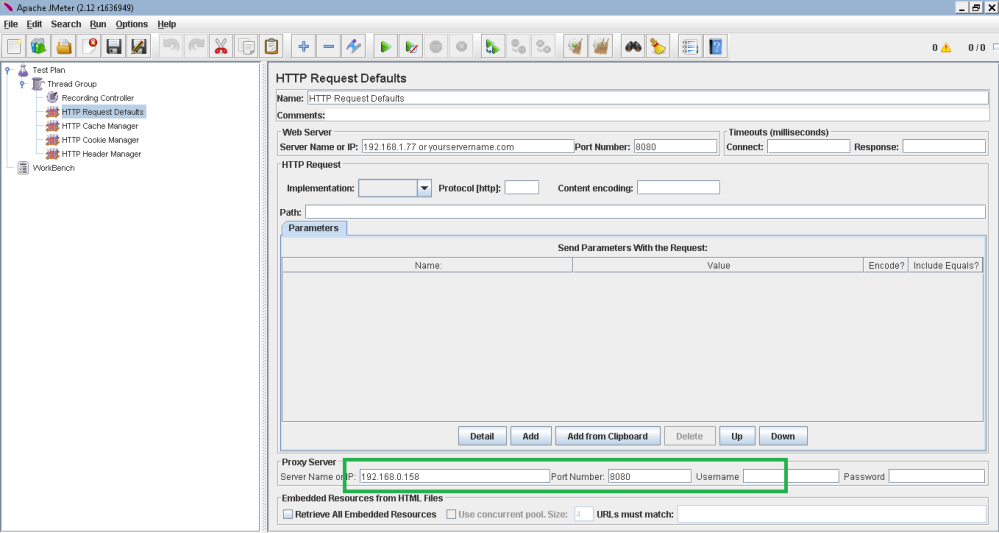
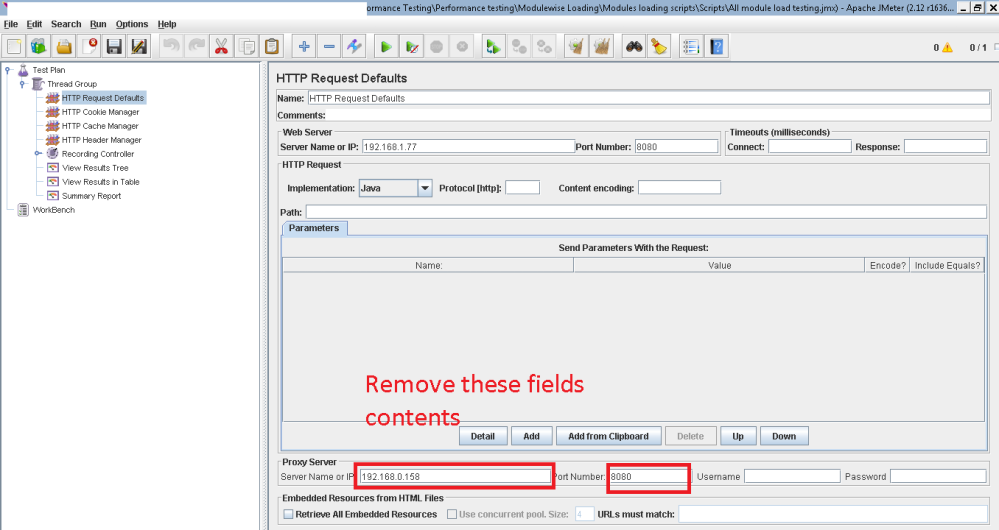
    6. Enter your system’s IP and default port in bottom of the HTTP requests.But remember – Remove this IP of your system when you start to run your recorded script.I will explain in last why this is?

    jmeter 6

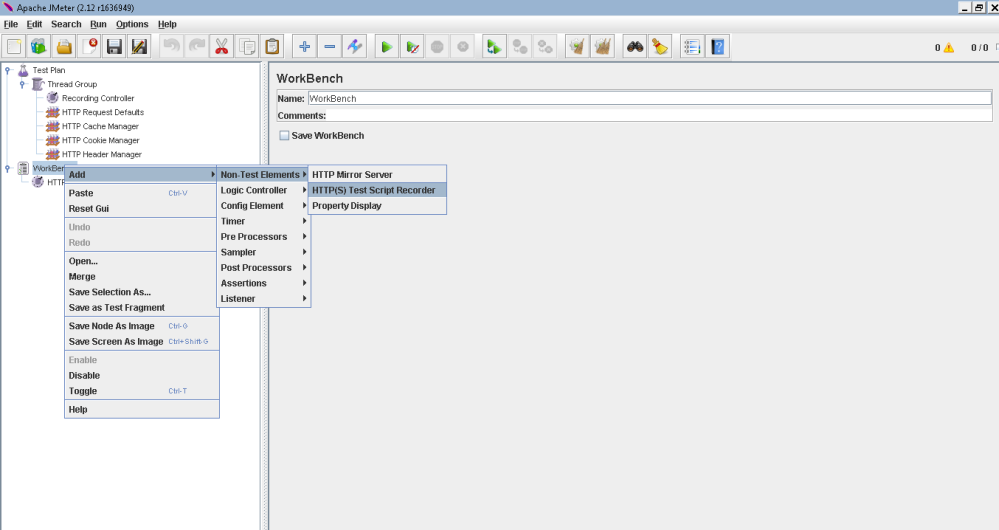
    7. Now right click on workbench > Non test element> HTTP test script recorder

    jmeter 7

    8. Now click start at bottom of the test script recorder –

    jmeter 8

    It will show a certificate message like below –1

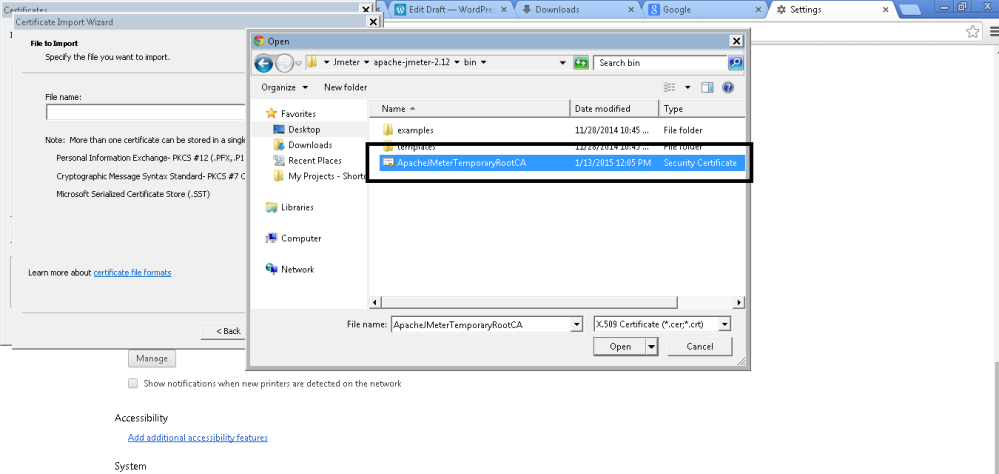
    9. Now you have to configure your browser and will import this generated certificate in your browser in which you want to record script – Open any browser>go to settings>Manage certificate>Import certificate >Select the generated certificate in Jmeter>Bin folder

    jmeter 10

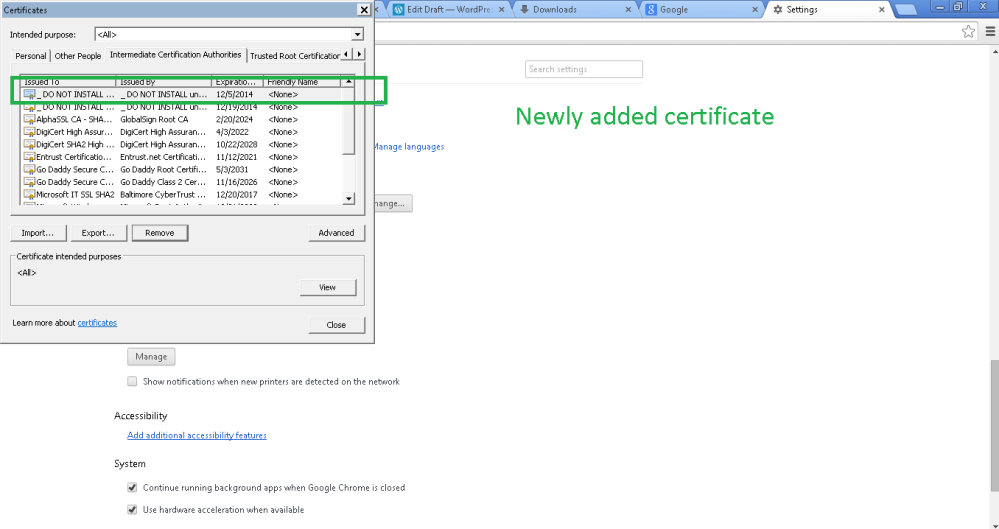
    11. Now after import successful of this certificate, you can check it into your browser and verify the certificate details –

    jmeter 11

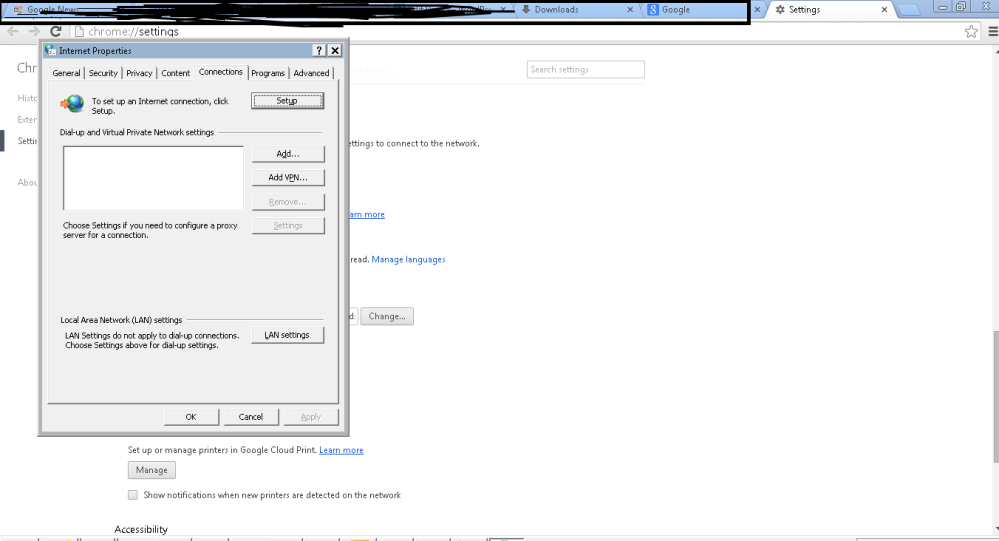
    12. Now you have to set your browser for Proxy . For this Go to browser>Settings>Network>Change proxy settings – You will open this popup

    jmeter 12

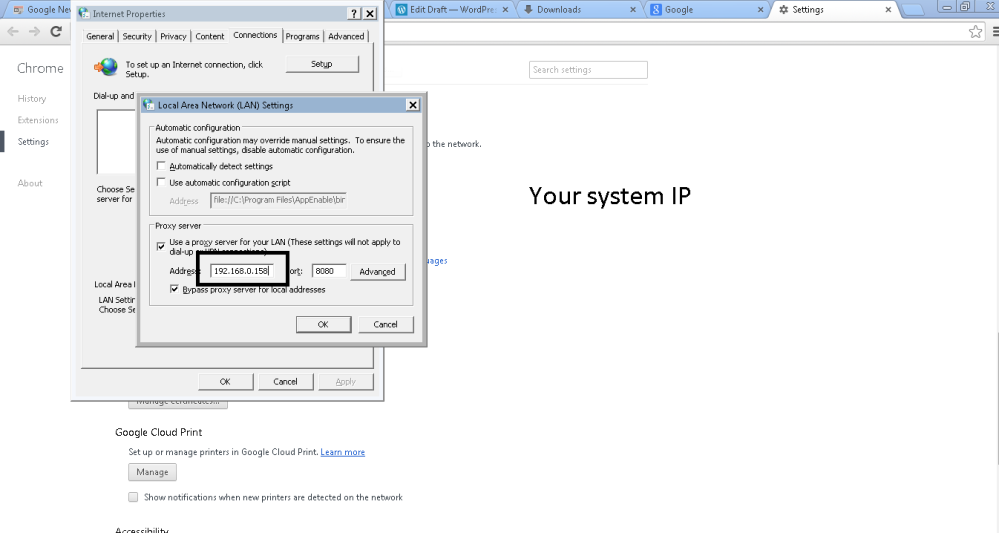
    13. Now Click on Lan Settings> Uncheck all check boxes and only Check Proxy server >Use a proxy server for your LAN >Enter your System IP address and Port (default 8080)

    jmeter 13

    14. Now Your browser is ready for recording. You can check this by entering any site like http://www.xxxyyy.com- It will show you page not available

    15. Now come to the Jmeter and click on Start button(If it is already stop) of HTTP recorder and enter your testing site in your currently configured browser (In above steps) –

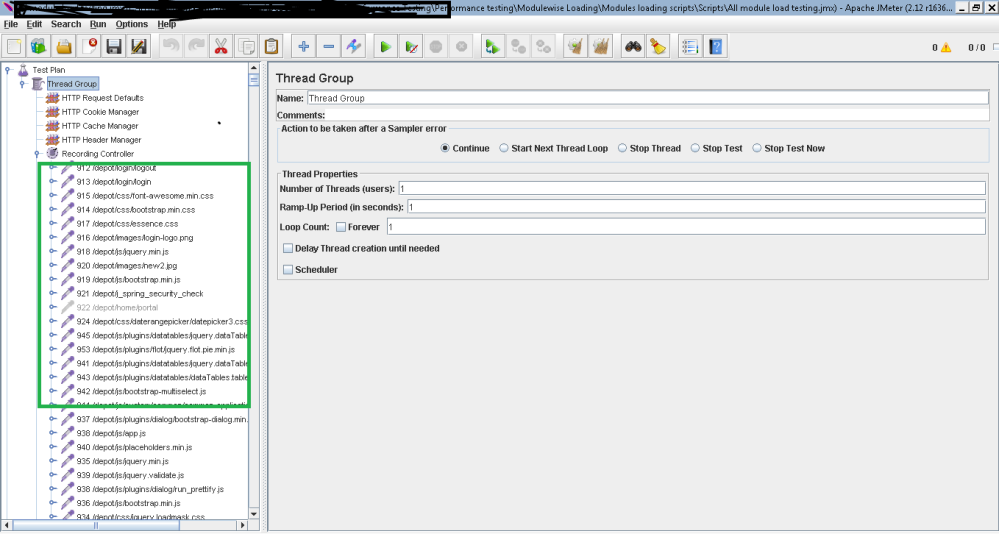
    You will see the recording script working under recording controller node –

    jmeter 15

    16. Now after your recording is done – Save this recording before running your test – File >Save as

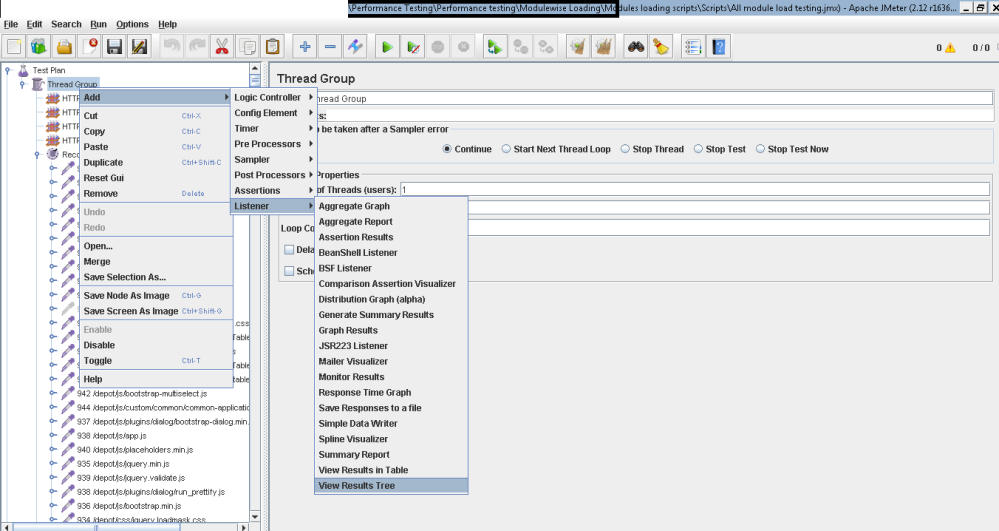
    17. Now you want to see your performance result so that you have to add listener before running test.You can right click on Thread group

    jmeter 16

    17.1 Now Click on run button (Green button >) and then select your added listener jmeter 17(Here is Result tree )

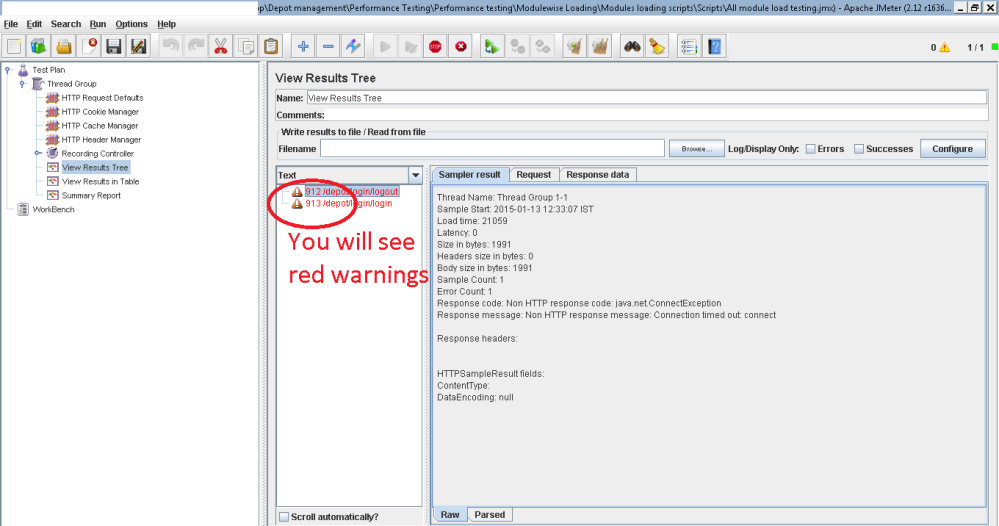
    18. After running you will see warnings in your test.It means your recorded test script is not working correctly.Now go to “HTTP Request default” by clicking in thread group tree and remove your system IP and port.

    jmeter 18

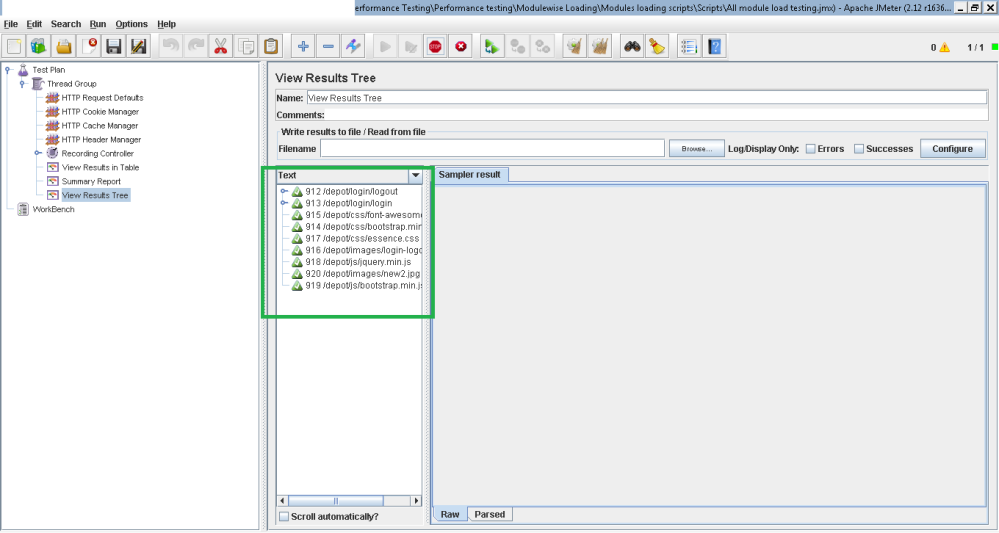
    19. Now save it and run again – Now your test will be passed and will show green status

    Jmeter 19

    1. For Checking the CPU performance, Memory Usage of the server, You have to Integrate Perfmon Plugin in your Jmeter.

    You can download perfmon plugin from universal Jmeter link-

    http://jmeter-plugins.org/downloads/all/

    Installation or integrate Plugin with Jmeter –

    1. JMeterPlugins-x.x.x.zip – contains plugins, must be unpacked into lib/extdirectory inside JMeter
    2. Restart JMeter to load new plugins
    1. Now you will see something new in your JMETER – like below image

    jmeter perfmon

    1. Now you have to configure your Perfmon Metrics collector (listener) for your server on which you want to perform load.

    For this You have to enter your server IP or server name like (google.com) in your Host Name and default Port should be 4444(Do not change this for all the hosts)

    jmeter perf2

    1. Now Save the Test Plan and do not run right now as there is one important step remained. L

    Your server will not send directly its CPU usage and also you do not know what amount of memory is installed on your Testing server.

    For this you have to run a simple server agent Batch file for windows (For linux .sh file)

    You can download this file (ServerAgent-2.2.1.zip,)from –

    http://jmeter-plugins.org/downloads/all/

    1. Now copy this Zip file on your server on which you want to test load.(In my case I have told to my Project manager as he had the rights of testing server on which my application is running)
    2. Extract the file in the C driver or Project folder of which IP you are using the application.

    Like in my case I was testing the application on 192.168.x.xx/projectname/login

    So I have installed the server agent on 192.168.x.xx  system folder where all the project files resides.

    1. Now come to the point and after copying server agent files. Open the folder and click on startagent.bat file on your testing server.

    It will run like in command prompt black screen. Do not close this command window on your testing server until your testing is not completed for performance of CPU and memory,because this agent will send the information to the Perfmon plugin on which you are using your jmeter (Testing server and Jmeter can be on same machine. In my case I was using jmeter on my machine and testing server was installed on other machine so…..)

    Now come to the machine on which you are running Jmeter.

    1. Now click to Run button on jmeter (Before starting if you see the chart by clicking perfmon listener, it will show message Waiting for samples….)
    2. After startup , it will show the grap like below –

    jmeter perf3

    1. Your graph will show readings in Percentage on Y axis and in seconds on X axis so do not be confused.
    2. You can also save this graph in Image format as well as in CSV or excel format simply by right clicking on the graph.

    jmeter perf4

    1. One thing to remember which I had mistaken – Server will not send its reading without Samples. So you have to record samples and side by side check their green status like below

    So this is completed your Perfmon plugin CPU performance reading and Memory usage.

    Thanks for reading …:)

    See you guys in next……. 🙂

    Thank you for your appreciation and donations 🙂 and if you really feel happy by reading this, then you can help us by donation using donation box or using paypal link https://www.paypal.me/knowledgeworldforyou 🙂 [Donation box is in the left side bar on our website (http://www.knowledgeworldforyouteam.com/ ) ] . We will be really grateful to you 🙂 and still we are 😉 .

    donation-box

    Please visit us and like on social media to encourage us more for writing and sharing with You.
    http://www.knowledgeworldforyouteam.com/
    https://www.facebook.com/Knowledge-World-For-You-1660665640835573/timeline/
    https://twitter.com/you_knowledge

    Thanks!!
    KnowledgeWorldforYou Team 🙂

Jmeter Simple steps for recording Proxy test script in browser

1. Open the Jmeter Application by clicking Jmeter.bat file in your Jmeter>bin folder-

jmeter 1

2. Right click on test plan>Thread groud>Add thread (Number of users you want to test for)

jmeter 2

3. Right click on thread group >Logic controller> Recording controller –

jmeter 3

4. Right click thread group>Config elements and add all four requests

4.1 HTTP default request, HTTP Cache manager, HTTP Cookie manager,HTTP header manager

jmeter 4

5. Now click on HTTP requests default and in right side enter server name like (jmeter.apache.org or 192.168.1.xx)and Port number (default 8080).

jmeter 5

6. Enter your system’s IP and default port in bottom of the HTTP requests.But remember – Remove this IP of your system when you start to run your recorded script.I will explain in last why this is?

jmeter 6

7. Now right click on workbench > Non test element> HTTP test script recorder

jmeter 7

8. Now click start at bottom of the test script recorder –

jmeter 8

It will show a certificate message like below –

1


9. Now you have to configure your browser and will import this generated certificate in your browser in which you want to record script – Open any browser>go to settings>Manage certificate>Import certificate >Select the generated certificate in Jmeter>Bin folder

jmeter 10

11. Now after import successful of this certificate, you can check it into your browser and verify the certificate details –

jmeter 11

12. Now you have to set your browser for Proxy . For this Go to browser>Settings>Network>Change proxy settings – You will open this popup

jmeter 12

13. Now Click on Lan Settings> Uncheck all check boxes and only Check Proxy server >Use a proxy server for your LAN >Enter your System IP address and Port (default 8080)

jmeter 13

14. Now Your browser is ready for recording. You can check this by entering any site like http://www.xxxyyy.com- It will show you page not available

15. Now come to the Jmeter and click on Start button(If it is already stop) of HTTP recorder and enter your testing site in your currently configured browser (In above steps) –

You will see the recording script working under recording controller node –

jmeter 15

16. Now after your recording is done – Save this recording before running your test – File >Save as

17. Now you want to see your performance result so that you have to add listener before running test.You can right click on Thread group

jmeter 16

17. Now Click on run button (Green button >) and then select your added listener jmeter 17(Here is Result tree )

18. After running you will see warnings in your test.It means your recorded test script is not working correctly.Now go to “HTTP Request default” by clicking in thread group tree and remove your system IP and port.

jmeter 18

19. Now save it and run again – Now your test will be passed and will show green status

Jmeter 19

So this is your test proxy recording completed successfully.

Thanks

Please like us for more to connect

http://www.knowledgeworldforyou.com/
https://www.facebook.com/pages/Knowledge-World-For-You/1660665640835573
JMETER GRID DATA LOADING TIME CALCULATION

People generally use Jmeter for calculating the load time of the page and its elements, but some time your page loads very early in seconds but the data grid or any table of data like names,countries etc takes time in loading.So if you only use the “HTTP requests default” samplers, then it does not help you to calculate the exact load.

I have also faced this problem in a project.So for calculating the overall loading time of the page, you will have to add other samplers also.

Add below three samplers and your JMETER will act like browser and will record overall loading time of the page including grid loading.

  1. HTTP COOKIE MANAGER
  2. HTTP CACHE MANAGER
  3. HTTP HEADER MANAGER
  4. HTTP REQUESTS DEFAULT

jmeter samplers

Thanks for reading…….

See you Guys in next post.

Please like us on facebook for more to connect
https://www.facebook.com/pages/Knowledge-World-For-You/1660665640835573